Run scripts on VMs after deployment with Bicep
Do configuration management on your VMs in Azure with post-deployment scripts using Run Commands and Bicep.
Bicep is an IaC-language which is created by Microsoft for Azure. Therefore, it does not have capabilities to do configuration management of Virtual machines directly. There are however ways to do some level of desired state configuration (DSC) on OS-level of Virtual machines using another Azure service. This service is Run Commands! Note that there is other services like Azure Automation and Azure Automanage that do DSC, but this blogpost is about Run Commands.
I have written about Run Commands on my blog before, and if you’re interested, you can find the post here. In short terms, Run Commands uses the Virtual Machine Agent to run scripts on VMs. These scripts can either be PowerShell or Bash if you have Linux VMs. Today I will demonstrate how to use Run Commands in a Bicep template that will deploy a VM and run a simple script on it post-deployment.
The Bicep template
First, we need the VM. I won’t go into too much detail on this part of the template, but what it does is that it creates a VM, NIC, and a Public IP address.
param location string
@secure()
param adminuser string
@secure()
param adminpass string

resource windowsVM 'Microsoft.Compute/virtualMachines@2020-12-01' = {
  name: 'VM-lab2'
  location: location
  properties: {
    diagnosticsProfile: {
      bootDiagnostics: {
        enabled: true
      }
    }
    hardwareProfile: {
      vmSize:  'Standard_B2ms'
    }
    osProfile: {
      computerName: 'lab2'
      adminUsername: adminuser
      adminPassword: adminpass
    }
    storageProfile: {
      imageReference: {
        publisher: 'MicrosoftWindowsServer'
        offer: 'WindowsServer'
        sku: '2022-Datacenter'
        version: 'latest'
      }
      osDisk: {
        caching: 'ReadWrite'
        createOption: 'FromImage'
      }
    }
    networkProfile: {
      networkInterfaces: [
        {
          id: nic.id
        }
      ]
    }
  }
}

resource nic 'Microsoft.Network/networkInterfaces@2021-08-01' = {
  name: 'VM-lab2-nic'
  location: location
  properties: {
    ipConfigurations: [
       {
          name: 'default'
          properties: {
             subnet: {
               id: vnet.properties.subnets[0].id
             }
            privateIPAddress: '10.0.0.10'
            publicIPAddress: {
              id: pip.id
              sku: {
                name: 'Basic'
                tier: 'Regional'
              }
              properties: {

              }
            }
          }
       }
    ]
  }
}

resource pip 'Microsoft.Network/publicIPAddresses@2021-08-01' = {
  name: 'pip-lab2'
  location: location
  sku: {
    name: 'Basic'
    tier: 'Regional'
  }
  properties: {

  }
}

resource vnet 'Microsoft.Network/virtualNetworks@2022-01-01' existing = {
  name: 'vnet-lab1'
}
I will then add the Run Commands part to the bottom of the template. For the Run Commands resource, I won’t need to specify too much. The resource will of course require the standard name and location that all resources require, but other than that, it only need two properties. Since Run Commands is a child resource of VMs, I will need to specify the parent. The parent is the VM that will run the script. Defining the parent will also create a DepensOn logic in the template. Ensuring that Azure will create the VM before trying to run the script.
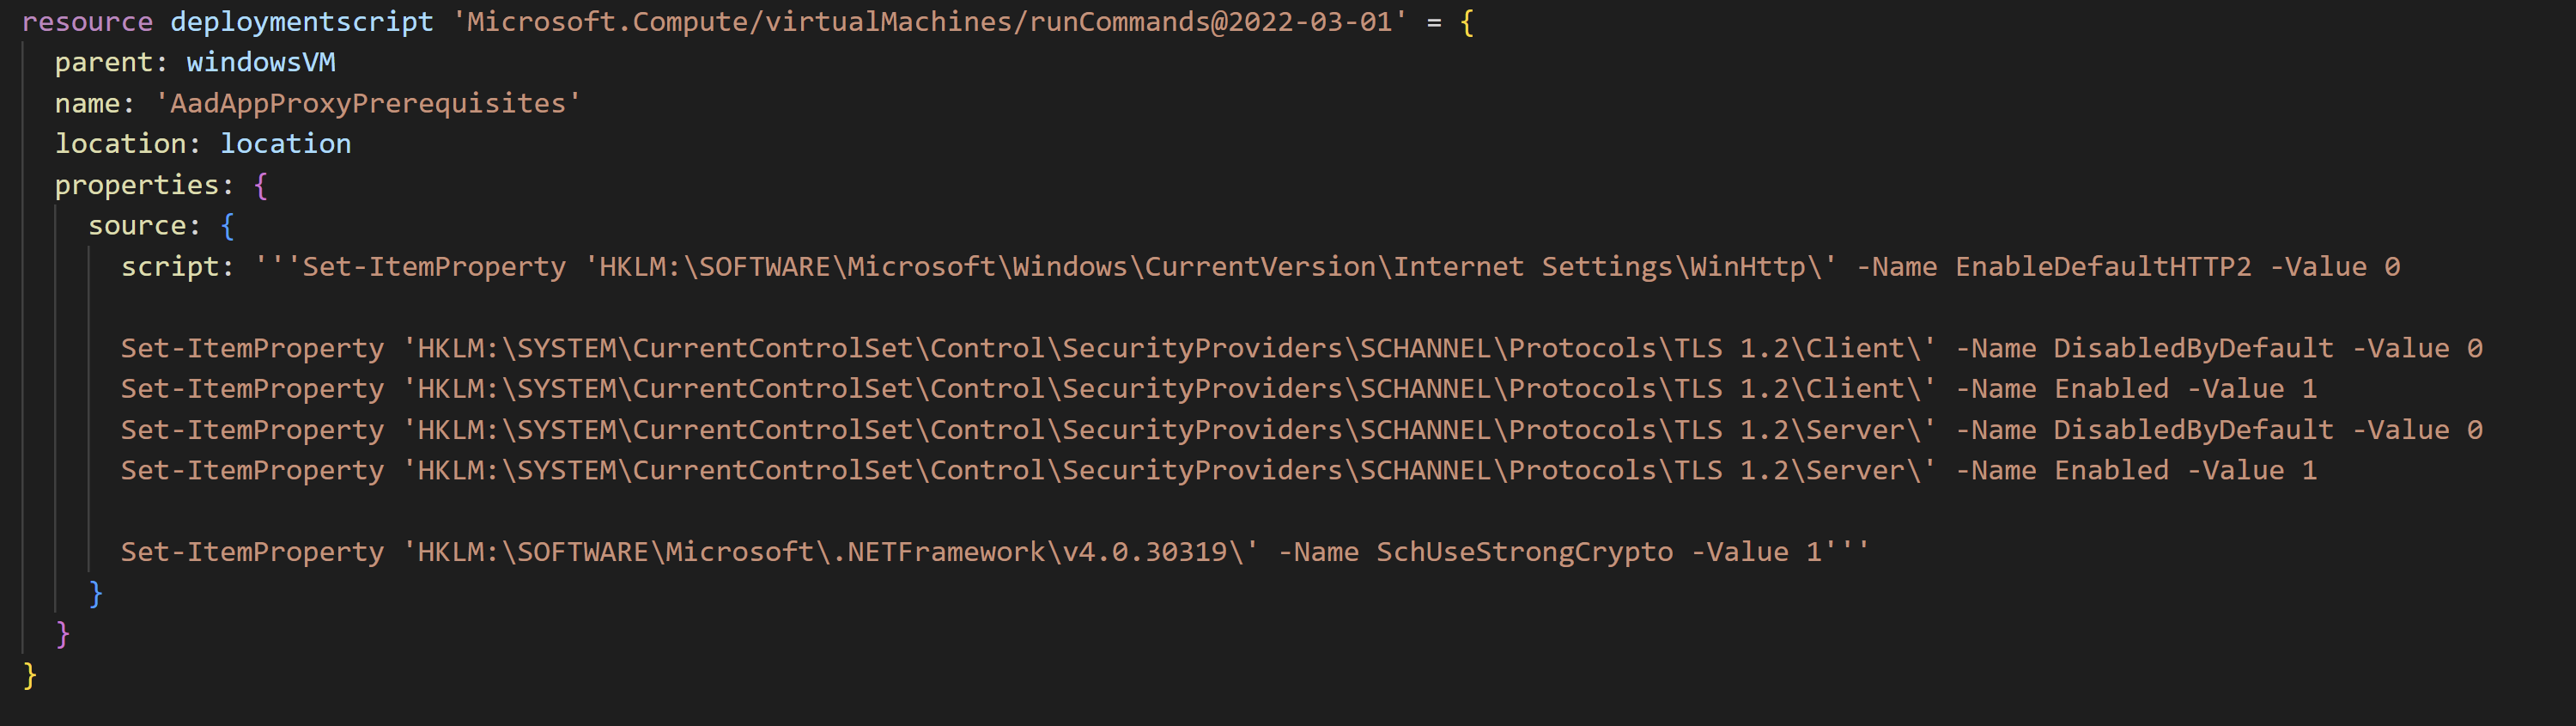
Lastly, I need to specify the script I want to run. My script is a PowerShell script that will set some registry keys. These registry keys are a prerequisites for Azure AD Application Proxy. Some of you might know that my script is in fact useless, because on Windows Server 2022 (The OS I have chosen for the VM I’m deploying) these registry keys that enable TLS 1.2 are there by default. But this script is for demonstration-purposes only. The only keys that this script will set is the DisabledByDefault ones. And that is how I will confirm that the script ran.
Here is the part of the template with Run Commands:
resource deploymentscript 'Microsoft.Compute/virtualMachines/runCommands@2022-03-01' = {
  parent: windowsVM
  name: 'AadAppProxyPrerequisites'
  location: location
  properties: {
    source: {
      script: '''Set-ItemProperty 'HKLM:\SOFTWARE\Microsoft\Windows\CurrentVersion\Internet Settings\WinHttp\' -Name EnableDefaultHTTP2 -Value 0

      Set-ItemProperty 'HKLM:\SYSTEM\CurrentControlSet\Control\SecurityProviders\SCHANNEL\Protocols\TLS 1.2\Client\' -Name DisabledByDefault -Value 0
      Set-ItemProperty 'HKLM:\SYSTEM\CurrentControlSet\Control\SecurityProviders\SCHANNEL\Protocols\TLS 1.2\Client\' -Name Enabled -Value 1
      Set-ItemProperty 'HKLM:\SYSTEM\CurrentControlSet\Control\SecurityProviders\SCHANNEL\Protocols\TLS 1.2\Server\' -Name DisabledByDefault -Value 0
      Set-ItemProperty 'HKLM:\SYSTEM\CurrentControlSet\Control\SecurityProviders\SCHANNEL\Protocols\TLS 1.2\Server\' -Name Enabled -Value 1

      Set-ItemProperty 'HKLM:\SOFTWARE\Microsoft\.NETFramework\v4.0.30319\' -Name SchUseStrongCrypto -Value 1'''
    }
  }
}
As you can see, the script is written as a multi-line string. It works for this short and simple script, but it’s not too good if you want to run a longer script. Fortunately, there is another way to do it. Instead of writing the script into to the template, I can upload the script to a Storage Account and use the property of SciptUri instead of Script in my template. That will look something like this:
resource deploymentscript 'Microsoft.Compute/virtualMachines/runCommands@2022-03-01' = {
  parent: windowsVM
  name: 'AadAppProxyPrerequisites'
  location: location
  properties: {
    source: {
      ScriptUri: 'https://saerrush832094.blob.core.windows.net/test/AadAppProxyPrerequisites.ps1?sp=r&st=2022-08-04T11:19:33Z&se=2022-08-04T11:19:33Z&spr=https&sv=2021-06-08&sr=b&sig=aDnDOkH78ZI%2FIvZQE4lt0%2FEgQLmTP%2Fq%2BvS'
    }
  }
}
Now this looks a lot better! The URL is a link to the PowerShell script in a blob container, at the end of the URL is a SAS-token that will give the deployment access to the file. The deployment will access the file and run the script.
The result
Let’s deploy the template and look at the results.
First, I’m using PowerShell and the AZ module to create the deployment:
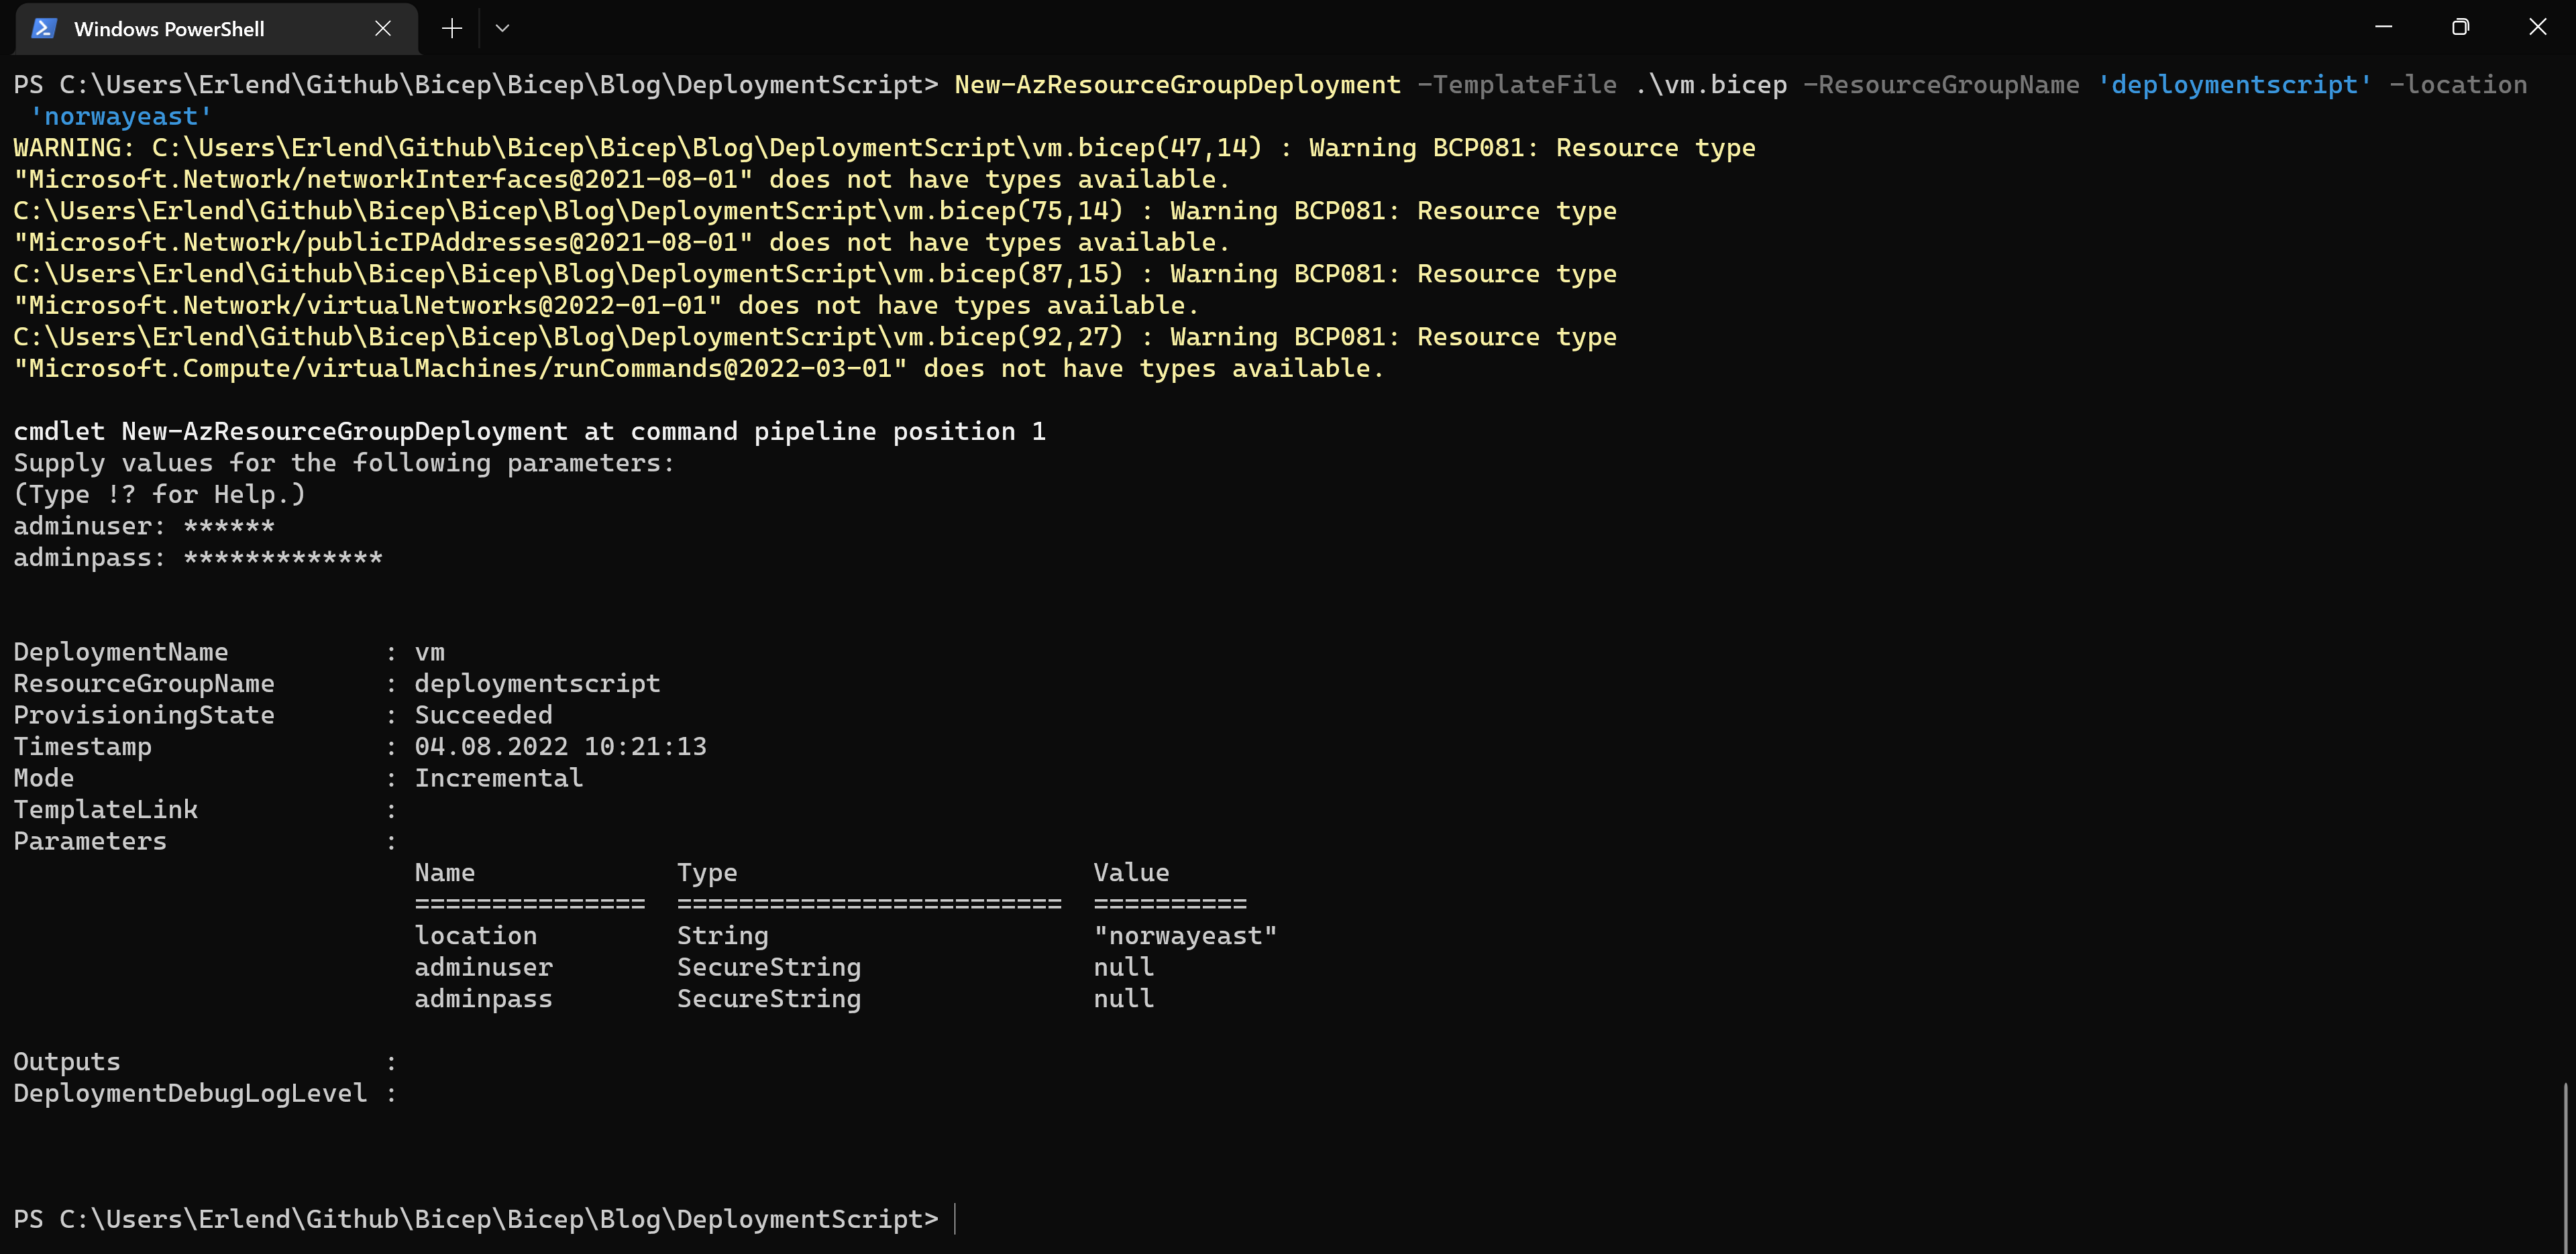
The deployment looks good from the terminal. Let’s check the Azure portal to see if all the resources were created.
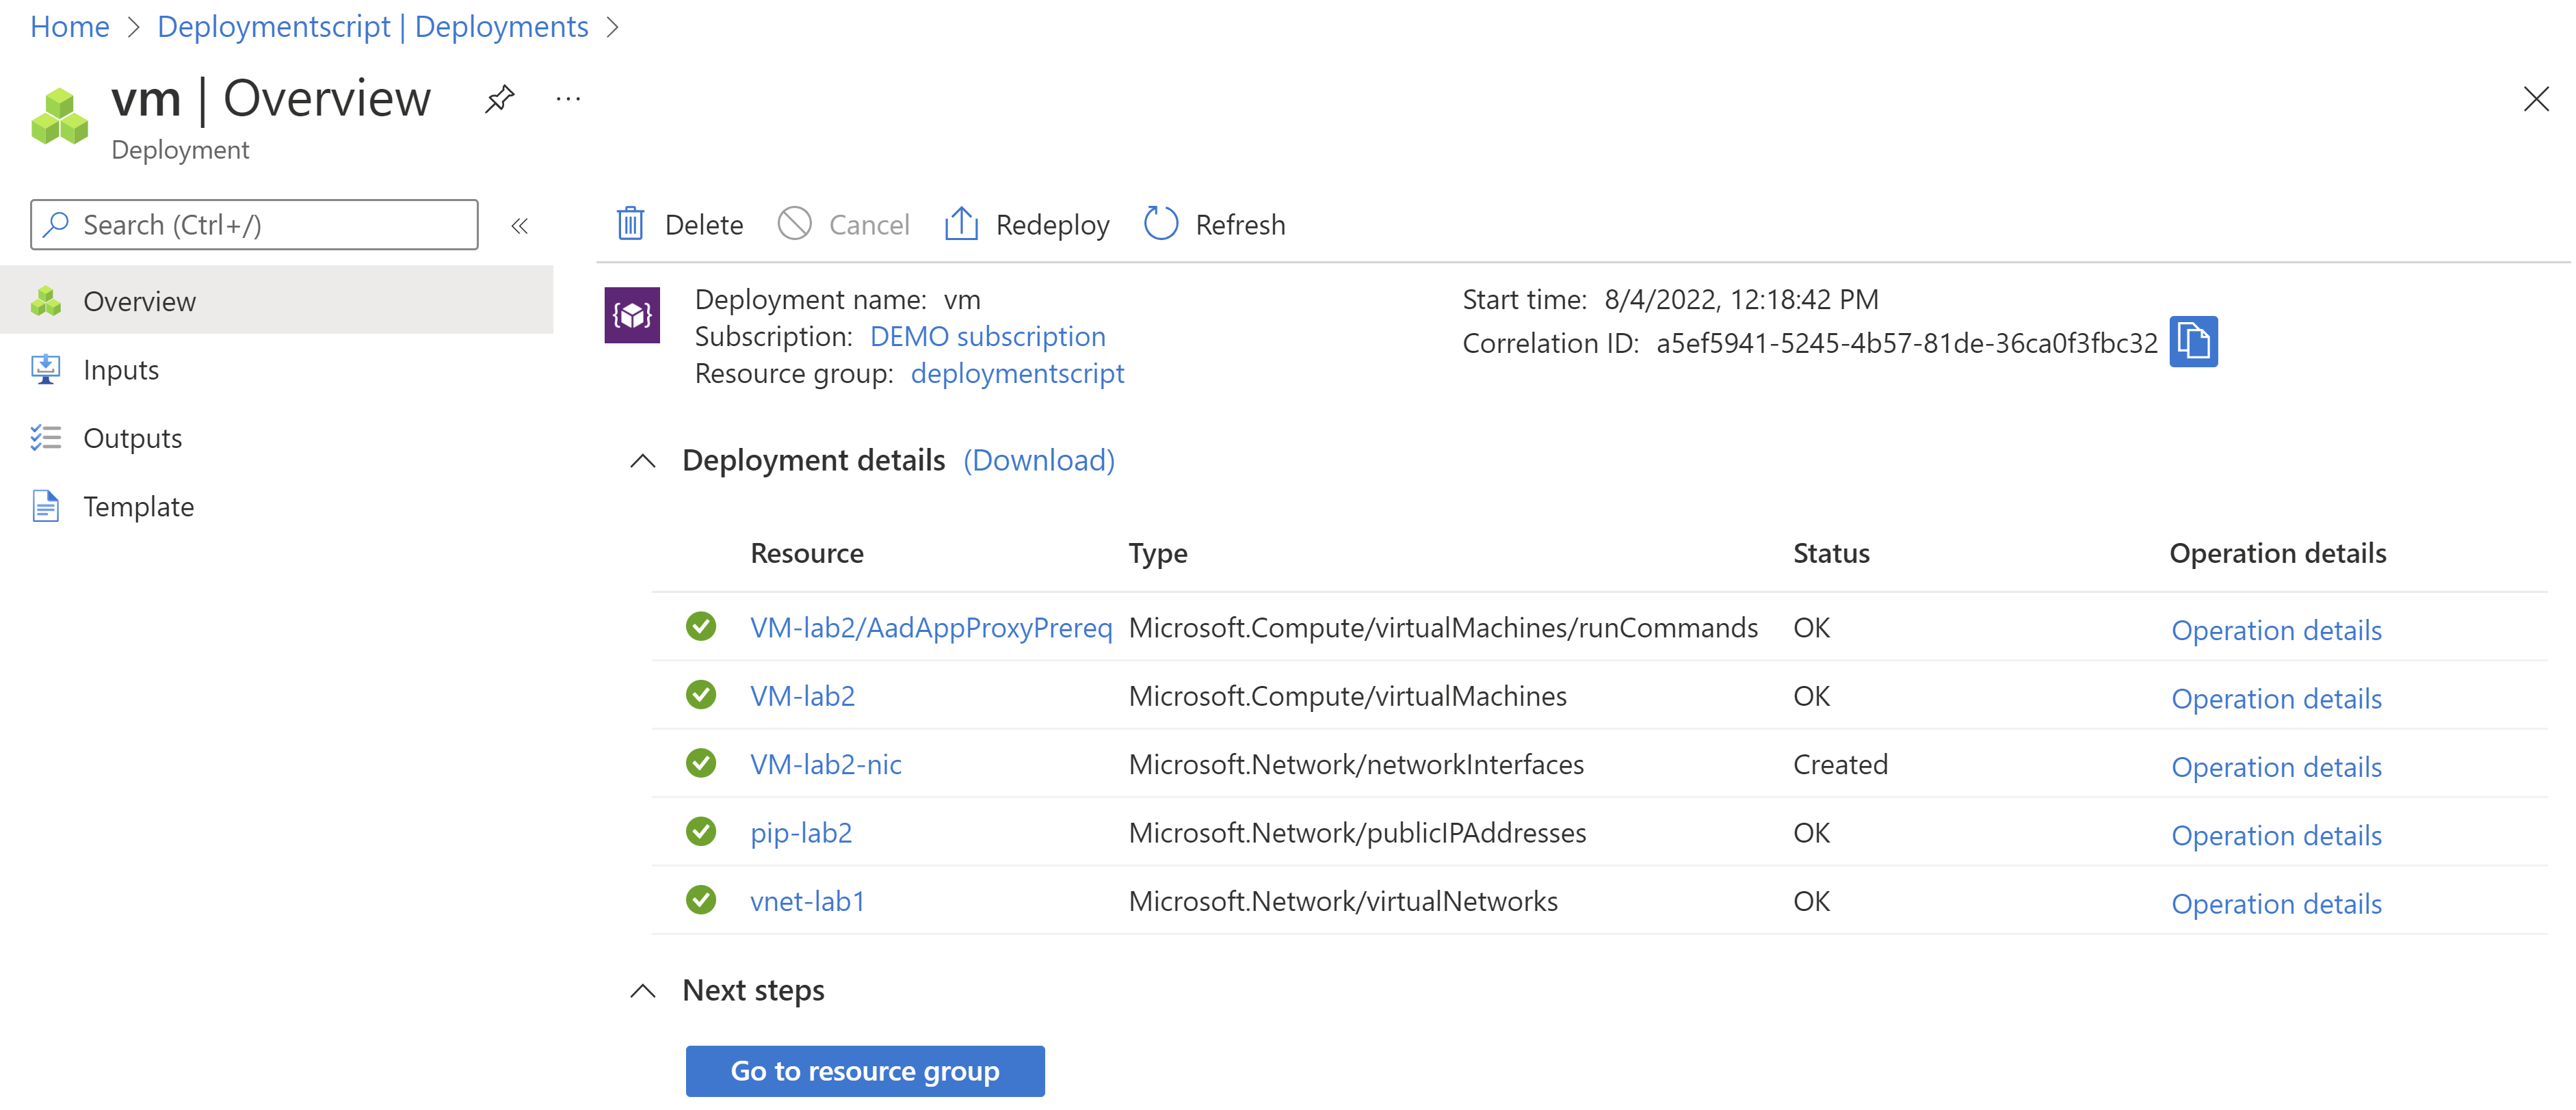
All looks good! I see that all the resources were created, even the Run Commands resource. That should mean that my script ran on the VM, but let’s check if that was the case.
To verify that the script ran, I RDP into the VM and check the registry for one of the keys that was not there by default.
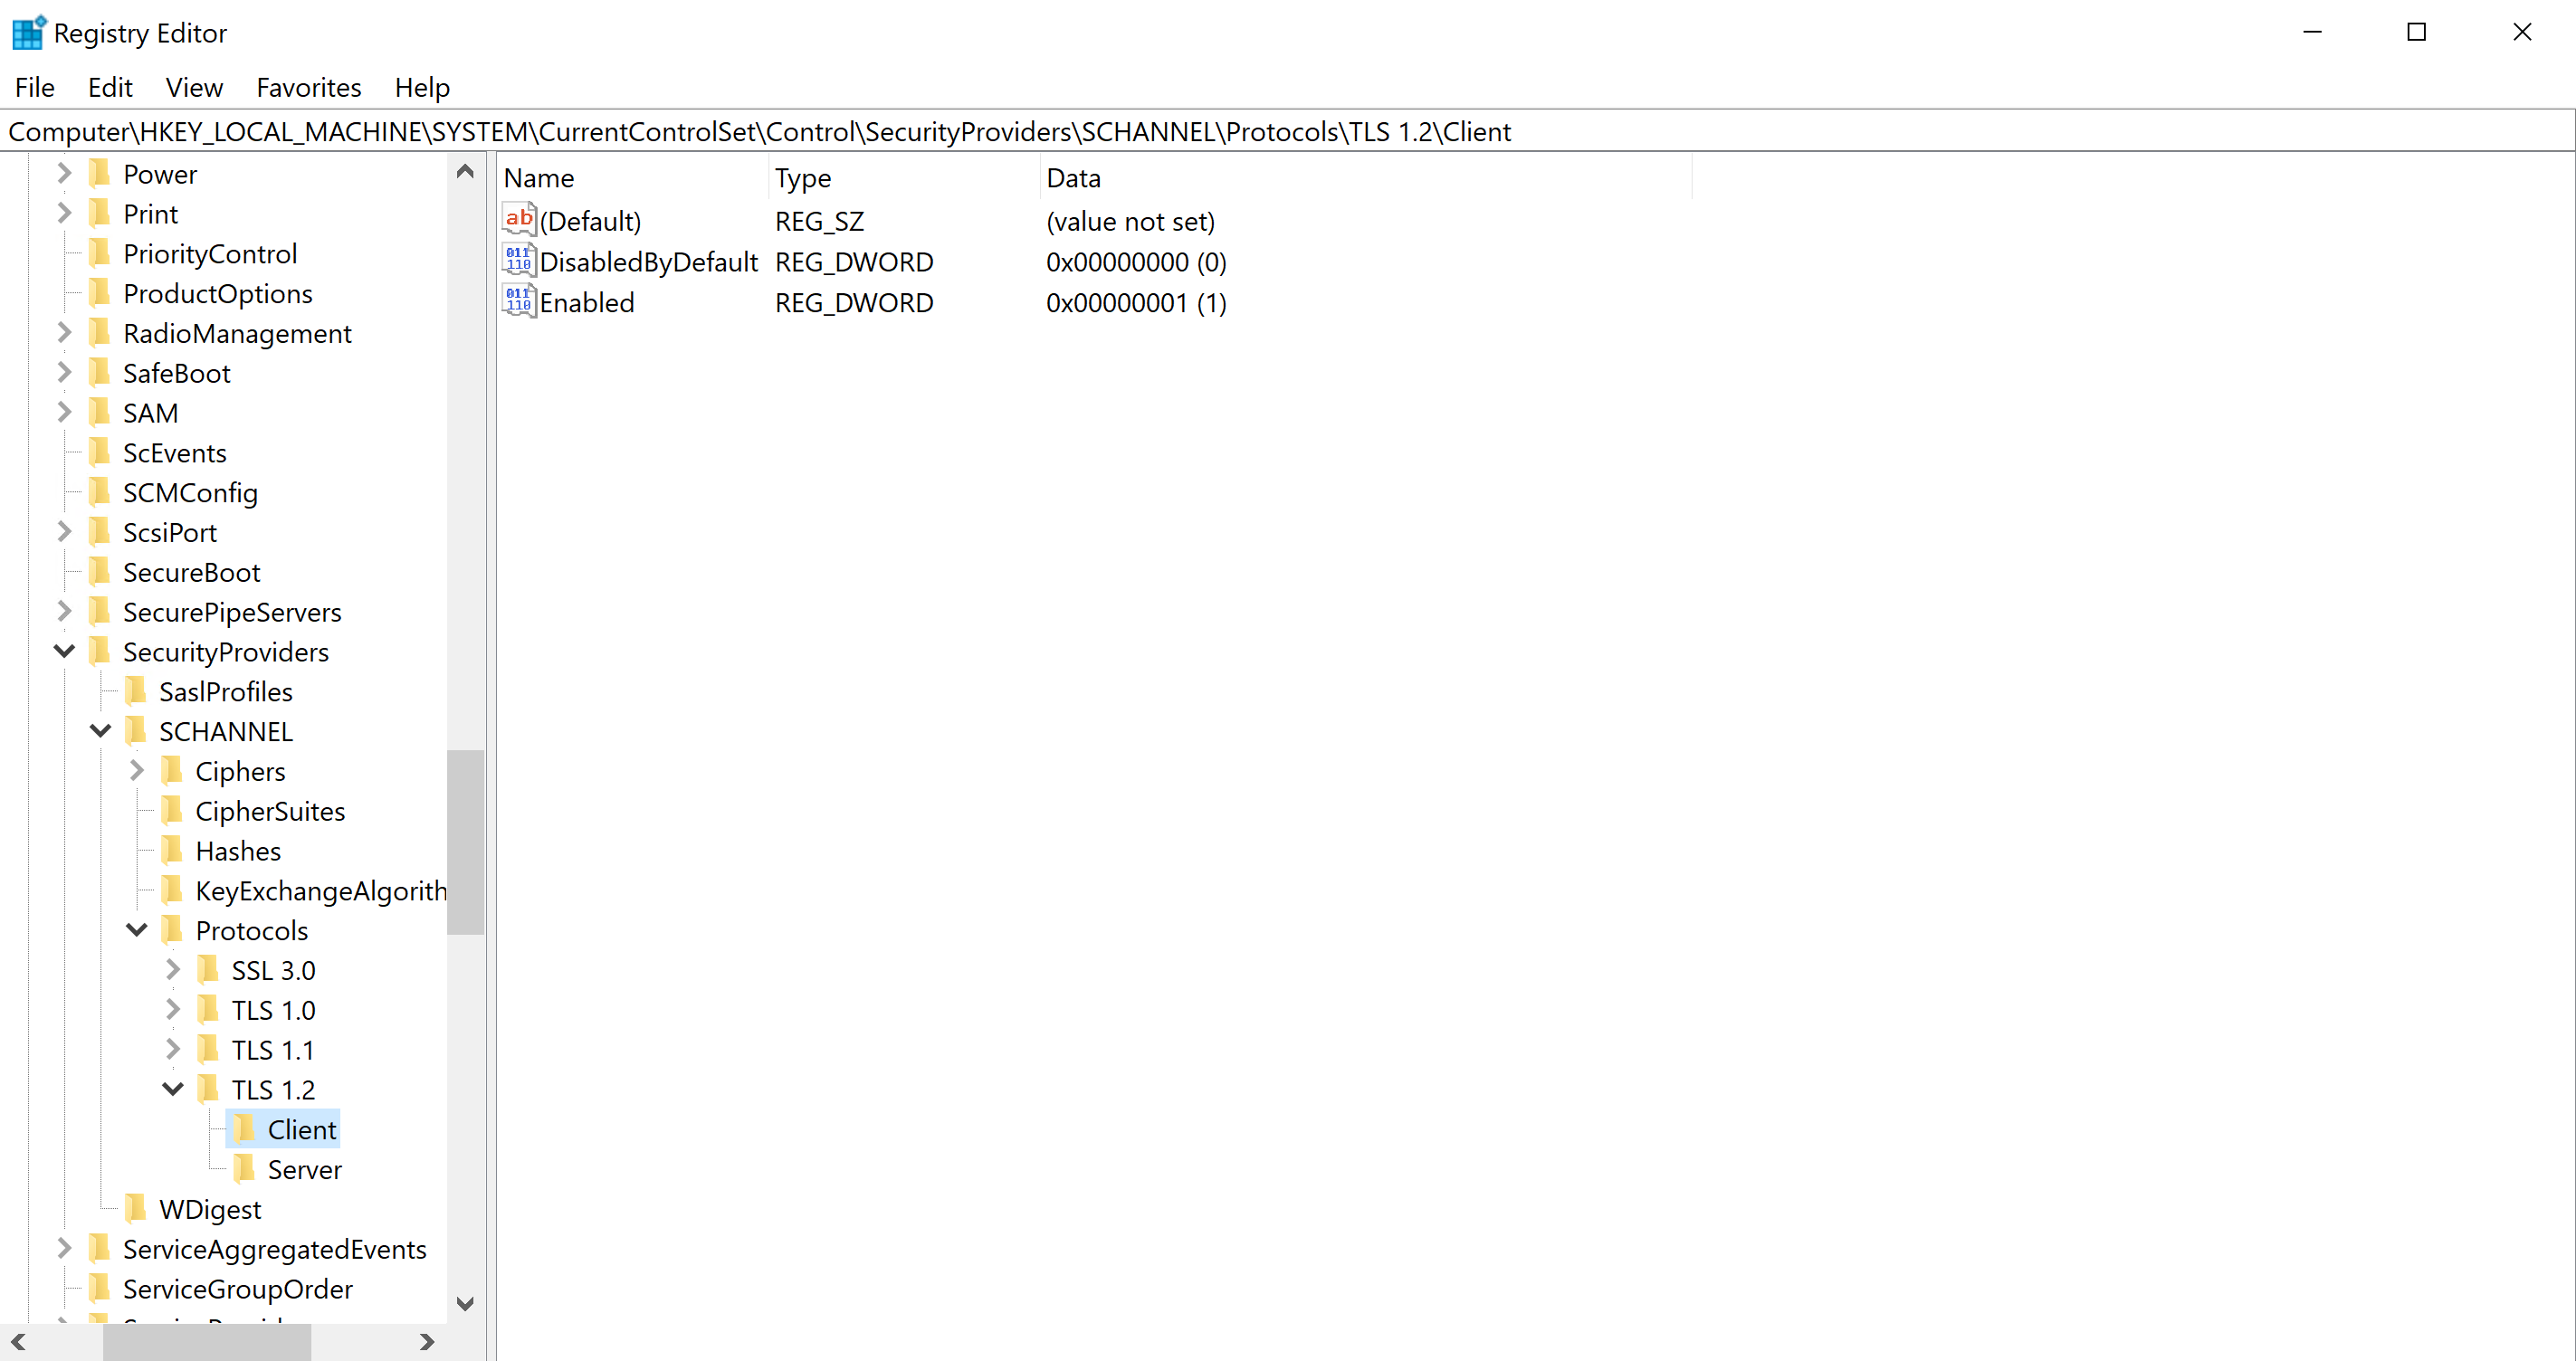
And there it is, the DisabledByDefault key is present. Meaning that my script ran as intended and I can now install Azure AD Application Proxy on it without problems!